Create A Remote IoT VPC Network With Raspberry Pi & AWS!
Why delve into the intricate dance of combining RemoteIoT and VPC networks with the unassuming Raspberry Pi? The synergy of these technologies unlocks a realm of possibilities, transforming the humble Raspberry Pi into a powerful hub for secure, scalable, and cost-effective Internet of Things (IoT) projects.
The convergence of RemoteIoT, Virtual Private Cloud (VPC) networking, and the Raspberry Pi presents a compelling paradigm shift in how we approach IoT projects. This isn't just about connecting devices; it's about creating a secure, manageable, and scalable infrastructure that can adapt to your evolving needs. Picture a scenario: you're a hobbyist fascinated by home automation, or perhaps a professional seeking to optimize industrial processes. The Raspberry Pi, traditionally known for its educational and DIY applications, becomes the linchpin in a sophisticated network. It acts as the central nervous system, allowing you to remotely monitor, control, and analyze data from a myriad of devices scattered across your home, office, or even a remote location. Through the magic of VPC networking, you create a private, secure 'playground' within the vast expanse of the internet, a digital fortress where your data is shielded from prying eyes.
Imagine transforming your home into an intelligent ecosystem, where lights respond to your voice, thermostats adjust automatically to your preferences, and security cameras keep a vigilant watch. Or, consider the potential for remote monitoring in industrial settings: sensors tracking equipment performance, providing real-time data, and alerting you to potential problems before they escalate. All this, and more, becomes achievable with the fusion of RemoteIoT, VPC networks, and the Raspberry Pi. The question then becomes, how do we unlock this power?
The applications of a RemoteIoT VPC network powered by a Raspberry Pi are vast and diverse. The core advantage lies in the creation of a secure and scalable network infrastructure. This is achieved through the implementation of a Virtual Private Cloud (VPC), a private network within the public cloud. This ensures data transmission is protected from external threats, offering a secure conduit for your IoT applications. Here are a few key applications:
- Home Automation: Control and monitor lights, appliances, security systems, and other devices remotely.
- Remote Monitoring: Collect data from sensors in remote locations, such as weather stations, industrial equipment, or environmental monitoring systems.
- Data Collection and Analysis: Gather data from multiple sources, analyze it, and generate insights.
- Industrial IoT (IIoT): Monitor and control industrial processes, automate tasks, and improve efficiency.
- Smart Agriculture: Monitor soil conditions, irrigation systems, and other factors to optimize crop yields.
- Education and Research: Experiment with networking concepts, security protocols, and data analysis.
Let's delve into the heart of the matter: setting up a RemoteIoT VPC network using a Raspberry Pi. This process involves several key steps, each critical to creating a robust and secure infrastructure. We'll explore these steps in detail, providing a roadmap for your own implementation.
The first step is to connect the Raspberry Pi to the VPC. This is the gateway to your secure, private network. It's crucial to understand the nuances of VPC configuration to ensure seamless communication between your devices and your chosen cloud platform (like AWS).
A Raspberry Pi VPC network is essentially a virtual private cloud that you create using the Raspberry Pi as the central hub. This creates a secure environment for running servers, hosting applications, and establishing a secure network for your IoT devices. Think of it as a personal data center, minus the hefty price tag and physical space requirements.
Creating a RemoteIoT VPC network using a Raspberry Pi on AWS is akin to bestowing superpowers upon your IoT projects. This setup empowers you to connect devices from any location, manage data seamlessly, and scale your infrastructure with ease. It caters to both the passionate hobbyist and the seasoned tech expert, taking your IoT endeavors to a new level.
In the digital age, the appeal of remote IoT VPC network Raspberry Pi setups, especially those that come with little to no cost, has soared among tech enthusiasts and professionals alike. The ability to create a secure and scalable network infrastructure using accessible hardware like the Raspberry Pi unveils a plethora of possibilities, spanning home automation, remote monitoring, and much more.
The practical application of a Raspberry Pi VPC involves setting up a virtual private network that connects multiple Raspberry Pi devices within a secure environment. This ensures that all data transmission is safeguarded from external threats, providing a reliable and secure channel for IoT applications.
The convergence of RemoteIoT, VPC networks, and the Raspberry Pi empowers you to harness the full potential of the Internet of Things. Among the many platforms and tools available, RemoteIoT, VPC network, and Raspberry Pi are particularly strong options for creating IoT projects that are secure, scalable, and reasonably priced.
Whether you are a tech enthusiast, a small business owner, or a major enterprise looking to streamline operations, grasping how to establish a remote IoT VPC network can bring about substantial improvements. It allows for enhanced security, optimized data management, and the flexibility to scale your infrastructure as needed. Consider the possibilities: improved home automation, streamlined remote monitoring, enhanced data collection and analysis, and the creation of custom IoT solutions tailored to your specific needs. All this, and more, is achievable with the right setup.
This guide will break down the steps involved in creating a RemoteIoT VPC network with a Raspberry Pi, providing you with a step-by-step walkthrough.
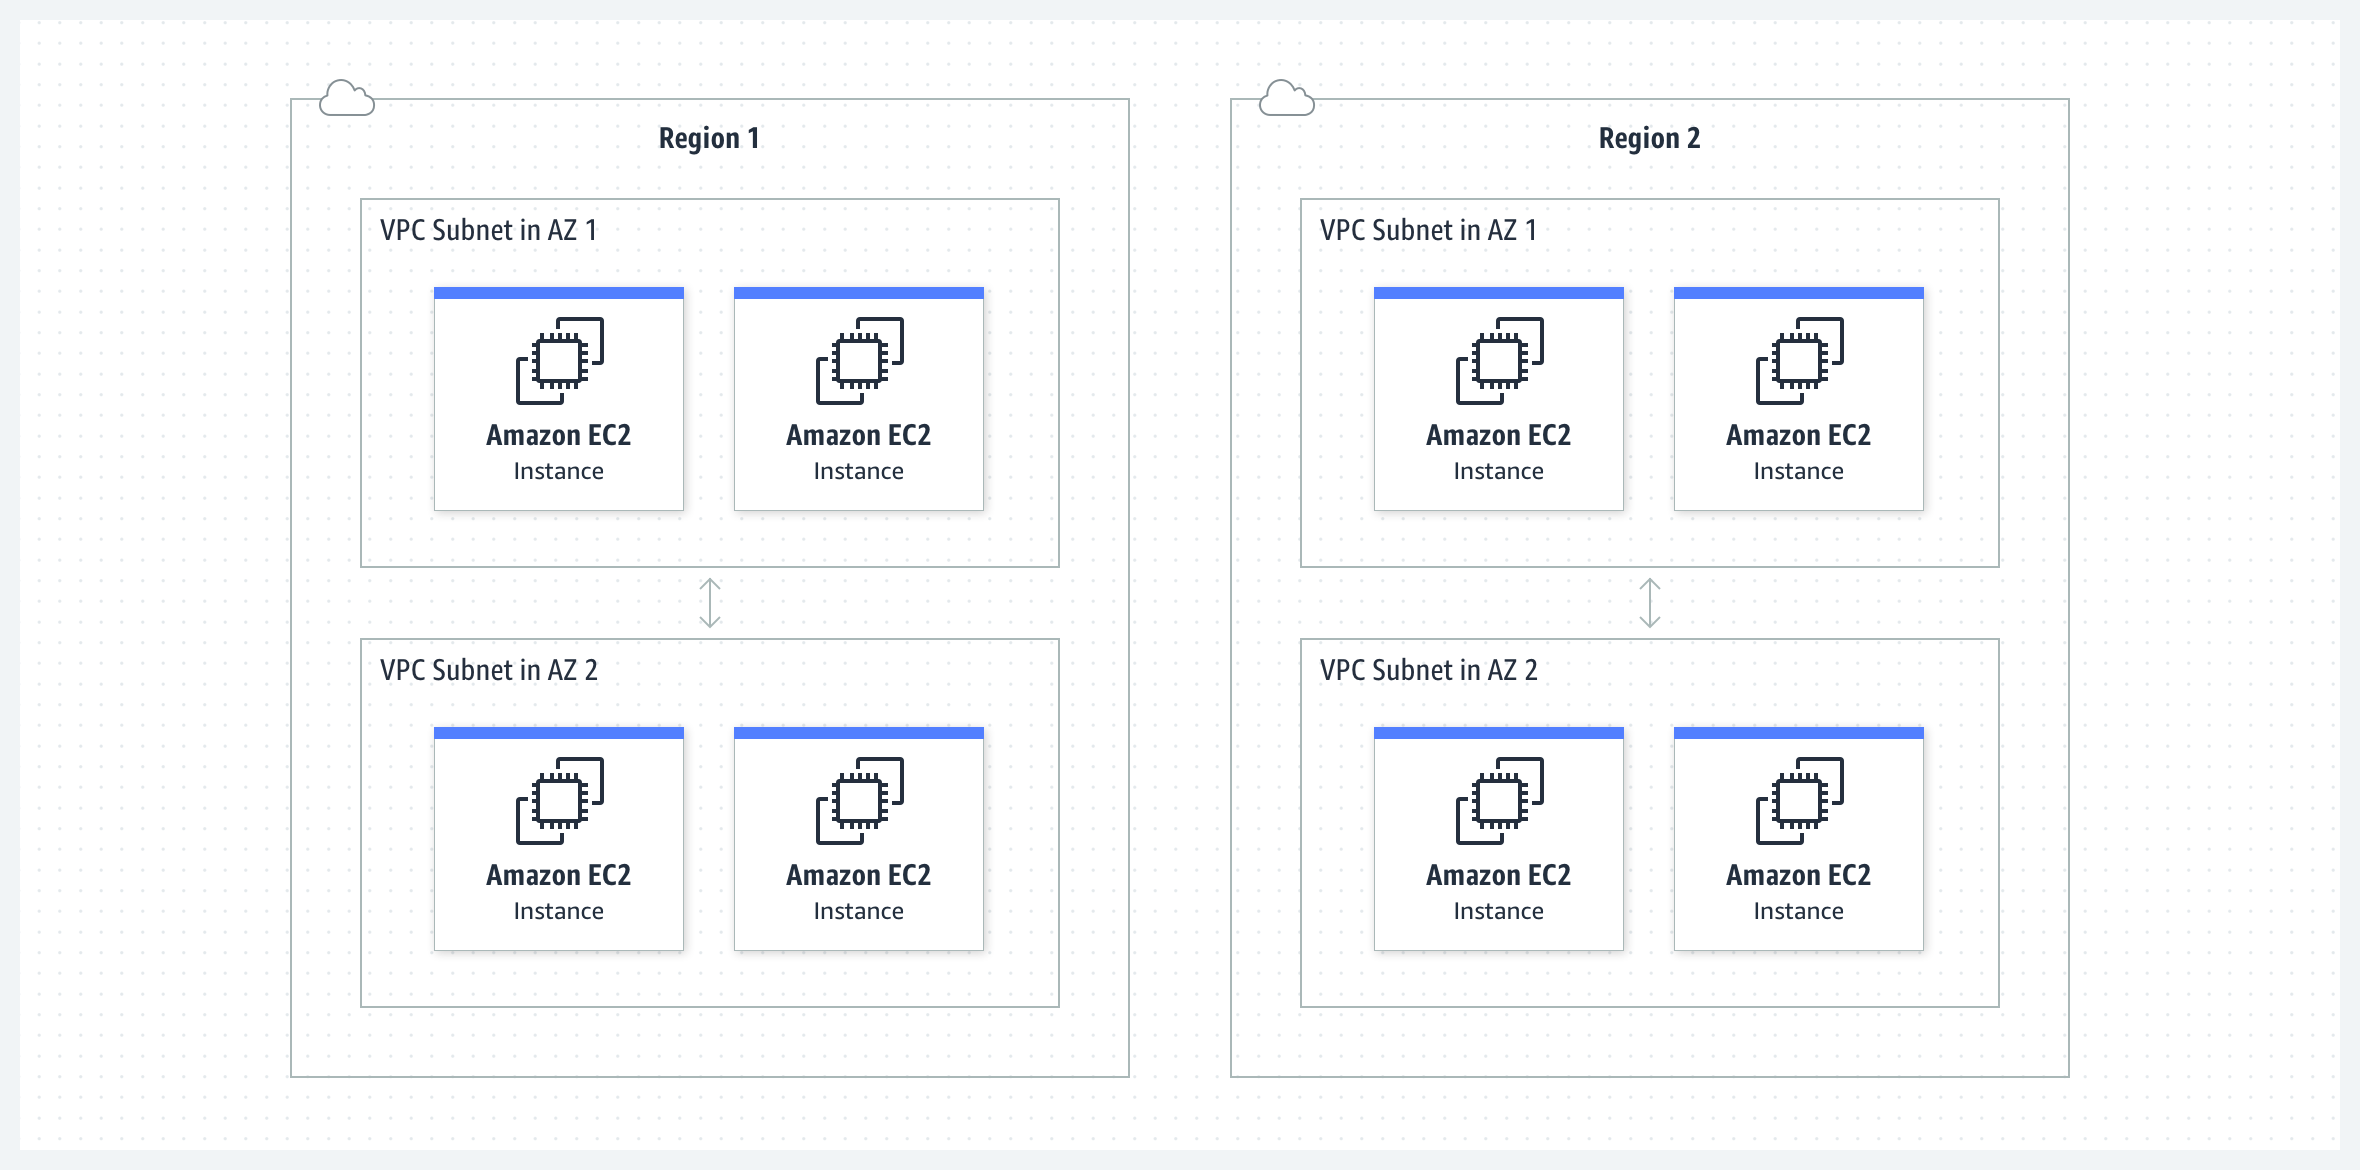
Before we begin, let's clarify what a VPC truly is. A Virtual Private Cloud is essentially a logically isolated section of the cloud. When you create a VPC, you're essentially setting up your own private network within a larger cloud environment, like AWS. This offers enhanced security because you have complete control over who can access your network, and you can define your own IP address ranges and network configurations. Your Raspberry Pi, in this scenario, becomes the core of this private network.
Let's outline the fundamental steps for setting up a VPC.
- Network Design: Determine the specific IP address range for your VPC.
- VPC Creation: On the AWS console, navigate to the VPC dashboard and click on "Create VPC." Give your VPC a descriptive name and define the CIDR block (IP address range) for your network. The CIDR block is an essential component, defining the size of your VPC network and the range of IP addresses. For instance, you could use a CIDR block like 10.0.0.0/16, which would provide you with over 65,000 IP addresses.
- Subnet Configuration: Subnets are essentially subdivisions within your VPC. Create subnets in each availability zone where you intend to deploy resources. Define the CIDR block for each subnet, which is a smaller IP address range derived from the overall VPC CIDR. For example, you might create a subnet with the CIDR block 10.0.1.0/24 for a subnet in one availability zone, which gives you 256 IP addresses for devices connected to that subnet.
- Internet Gateway (IGW): If you intend to allow your resources to access the internet, you must attach an Internet Gateway to your VPC. The IGW is a horizontally scaled, redundant, and highly available component that enables communication between instances in your VPC and the internet.
- Routing Tables: Routing tables direct network traffic. Modify the default routing table to send traffic destined for the internet (0.0.0.0/0) to the Internet Gateway. This ensures that traffic from your VPC instances can reach the internet.
- Security Groups: Security groups are essential for controlling inbound and outbound traffic to and from your resources. Create security groups that define the rules for allowing traffic based on source, destination, and protocols. For instance, you can allow SSH (port 22) for remote access and HTTP (port 80) and HTTPS (port 443) for web traffic.
- Network Access Control Lists (NACLs): NACLs provide an additional layer of security. They act as a firewall at the subnet level, allowing or denying traffic based on rules you define. They're typically configured to be less restrictive than security groups.
These steps lay the foundation for your VPC. With your VPC defined, you can then connect your Raspberry Pi.
- Set up your Raspberry Pi: Configure your Raspberry Pi with a static IP address within your VPC's subnet range. This is crucial for consistent communication and should be done through the Raspberry Pi's operating system settings. Ensure the IP address doesn't conflict with other devices on your network.
- Install necessary software: Depending on your specific needs, install software such as `OpenVPN` or other VPN software on the Raspberry Pi, for secure remote access.
- Configure the VPN: Set up the VPN to connect your Raspberry Pi to the VPC. Configure a VPN server to create a secure tunnel.
- Secure the Raspberry Pi: Implement strong passwords, enable two-factor authentication, and regularly update the operating system and software to ensure the security of your Raspberry Pi.
- Testing: Once the Raspberry Pi is set up with the static IP address, and the VPN is configured, test connectivity.
By combining RemoteIoT and VPC networks with a Raspberry Pi, you're creating a powerful and adaptable system. The Raspberry Pi becomes more than just a single device; it transforms into the central nervous system of your IoT network. Through the use of a VPC, all communication is secured, enhancing the protection of your data. You can create the foundation for a scalable architecture that fits your own home automation, remote monitoring, or any number of uses.
Building upon your VPC infrastructure, you can incorporate a multitude of IoT devices. Each device, be it a sensor, a camera, or a smart appliance, would be configured to securely connect to your Raspberry Pi-based VPC. This is where the magic of the RemoteIoT framework comes into play.
With RemoteIoT, you can create your private, secure "playground" in the vast expanse of the internet. Your devices can connect, send data, and receive commands without the security concerns of a public network. The management of your IoT fleet becomes streamlined and simplified. Whether you are working on home automation, industrial monitoring, or research, it's all possible with this approach.
Here is a breakdown of the key benefits of a RemoteIoT VPC network based on a Raspberry Pi:
- Enhanced Security: VPCs offer a secure environment for IoT devices by isolating them from the public internet and shielding them from potential external threats.
- Scalability: AWS's infrastructure allows you to easily scale your network to accommodate more devices or increased data volume.
- Cost-Effectiveness: The Raspberry Pi is inexpensive, making it a great option for your IoT projects.
- Flexibility: This configuration enables you to create custom IoT solutions that meet your specific requirements.
- Remote Access: You can access your IoT devices and data from anywhere in the world with an internet connection.
- Simplified Data Management: RemoteIoT streamlines data management through centralized collection, analysis, and storage.
Creating your own Raspberry Pi VPC provides several advantages.
- Cost Efficiency: Raspberry Pis are considerably less expensive than dedicated servers, providing a cost-effective solution for smaller IoT projects.
- Customization: You have complete control over your network's configuration, allowing you to tailor it to your specific requirements.
- Learning Opportunity: This project allows you to gain hands-on experience with networking, security, and cloud technologies.
- Portability: The compact size of the Raspberry Pi enables the flexibility to easily move your setup as needed.
These advantages combine to make the Raspberry Pi an ideal choice for creating a VPC for your IoT applications, especially for individuals or small businesses with limited resources.


